Web Development
Coding
Technology
April 19, 2025
Guide Me to Shore: Lighthouse Refactor Case Study - Tsundoku
A case study on maximizing web performance of a Next.js application through media reformatting, hybrid rendering strategies, and building local fonts

Steven
Software Engineer

What and Why
I took my blog platform from sub-75 Lighthouse scores to near-perfect 100/98/100/100. This is the first refactor I performed on Tsundoku and I reduced total media size by 95% and improved page load times by over 80%, using Sharp, FFmpeg, and a custom Sanity.io pipeline.
These changes didn’t just make Tsundoku faster—they boosted engagement, improved search visibility, and laid a scalable foundation for future content growth; and faster pages and stronger metrics mean a better user experience and higher SEO rankings.
This article breaks down every major decision, tradeoff, and lesson from the refactor—from the perspective of a self-taught developer with 16 months of focused practical experience. I’m writing this as a case study to prove to myself and others I can build fast, scalable, and user-friendly systems from the ground up. If that sounds interesting to you - here’s how I did it.
Sections
- 1. 🗺️ Identifying Performance Issues
- 2. 🧭 Using Lighthouse
- 3. 📈 PNGs to WebP
- 4. 🛠️ Tools: Sharp
- 5. 📹 Tools: FFMpeg
- 6. 🖼️ Handling Media in the Frontend
- 7. 🏗️ Custom Media Component
- 8. 📊 Optimizing Media Impact
- 9. 💧 Page Hydration
- 10. 🔡 Fonts
- 11. 📱The Mobile Image Fix
- 12. 🖥️ Code Reduction
- 13. 📝 Final Performance and SEO Results
- 14. 🔐 Private GitHub Repos
- 15. 🤝 Connecting
🗺️ Returning to the Blog and Identifying Performance Issues
After several months dedicated to learning and growing as a developer, I came back to my blog and portfolio to write about my new skills and see if I could improve the content of my projects. I rewrote everything in my portfolio site to give each project brevity by highlighting the key points and takeaways of each project while leaving the lengthy content here on Tsundoku.
Once I rebuilt the portfolio site and reuploaded it to my web hosting platform, I used the analytics tools to see if my website was performant - and it was not. It used to score a solid 95 on performance, but after the rework it was down to about a 75 performance score.
From the analytics tool, I learned more about First Contentful Paint and Largest Contentful Paint (LCP) and how they were key metrics for web performance. They each indicate how long it took for the first and largest content elements visible within the viewport to render respectively- and both were taking huge hits.
On my sites the LCP was often large images, and that render time had dramatically increased since the last time I checked performance metrics. My initial DOM renders (what was visible in the viewport) were completing in around 1,200ms and the full pages were taking between 3 and 4 seconds at times.
Out of curiosity I checked the performance of my blog site, and learned that I had no history of performance checks there as I had never used the analytics tools on that project specifically before - an abysmal 71 performance score.
I had to look into this and find out what was happening. I figured this would also be a good opportunity for me to take a break from learning and actually apply some of the knowledge that I had gained in my short time away from the IDE.

🧭 Using Lighthouse for Direction
In the browser DevTools, I ran a Lighthouse report - and it gave me similar speed scores as my web hosting platform, but more importantly it also gave me accessibility, Best Practices, and SEO scores - along with some detailed insights on how I could improve things that were lacking. Now I had some clear direction, and the first place to start was with the images on Tsundoku.
I opened the network tab to do some analysis - the resources contributing to the First and Largest Contentful Paints were taking so long to load. Most of them took about 200-300ms while some even took 600-700ms; per image. I also noticed for the first time that my images were Megabytes in size, anywhere from 2Mb to 4Mb.
That’s a HUGE deal. Even though network requests run off the main JavaScript thread, waiting for these large resources to download and render still delays the browser's ability to efficiently process and render the page content.
I considered lazy loading for all media on the page, but it caused large amounts of whitespace where the main image was supposed to be while the rest of the page loaded. This is the first thing a user is supposed to see, so this was an issue that needed urgently addressed.
I had already avoided layout shifts by reserving image space using containerized divs, but the loading times were still a problem. I needed to reduce the size of my images.

Be careful when choosing a standard format for images - larger and higher quality images take more time to download and render
📈 Addressing Image Performance: PNGs to WebP
I was using PNGs for everything, because previously I learned that PNGs include alpha channels that allow for transparency in certain parts of an image - and have some other properties that generally make higher quality images. I didn't consider how much space they actually required though.
I looked into alternatives for image formatting and I learned that the “next generation” of web image formatting is 'Web Picture Format' or WebP. It was developed by Google to decrease file sizes compared to JPG/JPEG and PNGs while still supporting alpha transparency and even short animations like GIFs.
The average article on Tsundoku has about 8-10 images, but can support up to 25, and that is a huge amount of data to download per page with my current and planned setup, so I decided to convert all of my static image media to WebP.

The left box is 20 images formatted to WebP - the right box are the same 20 images in PNG format; ~95% reduction in size
🛠️ Finding the Right Tools (Sharp)
As it turns out - Sanity already defaults most image conversion to WebP or AVIF when the browser supports it and if you explicitly state on the URL image builder (the tool that pulls URL strings from the Sanity CDN and converts them to an image URL with transformations) that the URLs should be converted with auto("format"). This is intended to convert PNGs to WebP files, including preserving transparency.
However, for some reason, they wouldn’t automatically convert the PNGs when fetching from the content delivery network (CDN) and rendering in the frontend in my specific case. Even though WebP supports transparency, it seems that the Sanity image builder’s transformer didn’t want to take the risk for these particular assets. At least it didn’t want to for me 🤭
It’s very possible that I had something misconfigured, but I decided to just manually format all of my image media on my project’s database anyway for peace of mind and practice. I downloaded all of my images from the CDN and got to work.
I found an NPM package - Sharp - that is a Node.js wrapper around the libvips image processing library and allows for someone to easily write a Node script to convert image formats, resize, rotate, transform and alter images in many ways.

WebP is really the next generation of web image formatting. Small, fast, supports animation, and supports alpha channels
So I wrote a quick Node script to convert all of the PNG files in a directory to webp files with Sharp, fs, path, and url modules and it worked perfectly.
This was a great tool to have in the toolbelt later for any other image processing or conversion that I want to do for future projects, because I hate going on shady obscure website based services that have limits, watermarks, and probably even keep metadata or copies of my images 😖
Anyway, now I have all these nice webp images, and they upload just fine with my current setup and are at least 90% smaller than the PNGs I was using for all of my images. The image field type on the schema I was using for the studio accepts WebP format images, so I didn’t have any problems just plopping the new images in place of the old ones - and the pages on the site were already much faster.
With each image now being fetched and rendered within 50-60ms, in 10 image articles I was already cutting my LCP and perceived image load times significantly.

My script running a conversion from PNG to WebP and simultaneous deletion of those hulking PNGs
📹 Adding Video Support: GIFs to MP4
While I was changing how I handled media on the site, I decided to add input for official video support in my studio as well - since my GIF files were up to 10 times larger than my largest PNG. These GIFs were anywhere between 20 to 40MB in size and were taking four entire seconds to load in by themselves, and that was totally unacceptable.
I could have converted all of the GIFs to WebP, because WebP is amazing and supports animation, but WebP does not support audio or scrubbing and it has limited browser control for playback. For this refactor, I wanted to go with MP4 for animated images or video files just in case I wanted to add rich video files in an article later.
Sharp doesn’t support video formatting—only images. So I did some research to find a way to convert GIFs to MP4s locally, similar to my image pipeline. That’s when I found FFmpeg - a popular, powerful, well-established media processing library that supports video, audio, and image transformations.
To use it, I installed FFmpeg globally and added it to my system PATH so I could call it directly from the CLI. I then wrote a Node script to convert my GIFs into MP4s using FFmpeg commands, keeping the process local and fully customizable.

Converting all animated media to MP4 to give my platform video support
Now I have a nice, new, clean toolchain: Sharp for image conversion to WebP, and FFmpeg for converting GIFs or videos to MP4. This workflow reduced the size of my static media by ~95% and my animated media by an astonishing 98–99%—from 30MB on average to just 300KB. Absolutely beautiful and completely customizable for any of my media conversion or transformation needs in the future.
🖼️ Handling Media in Sanity & Frontend: Schema and Component Challenges
There was a new problem now though - the image fields that I defined in my Schema type don’t support MP4s (or any video files), and there is no native video schema type in Sanity; but there is a file schema type.
The file type has an options object attribute that has an accept property where you can specify any Multipurpose Internet Mail Extensions (MIME) type to be accepted in this field in the studio. That means I can customize an input for my studio to allow for the acceptance of just about any type of file.
So for example, I specified in my file type blocks to accept “image/webp” and “video/mp4” formatted files. Now I can replace my image blocks used for body content with file blocks and upload either without having to change too much of my existing codebase.
It should be noted however that Sanity recommends you do not use the file type for images, because the dedicated image block and its associated image builder component are calibrated to provide rich metadata to images like dimensions, aspect ratio, resizing, and formatting when pulling them into the frontend.
The image block also gives you some additional features like cropping and a “hotspot” selector that allows you to focus on a spot of an image that will always be in focus no matter what dimensions your image gets resized into.
Since I was using the file type for both images (WebP) and videos (MP4), I had to compensate for the absence of these features in my codebase with a bit of extra formatting, styling, etc.

This is what it would look like if I was an animated character adjusting schema types in my CDN through the eyes of AI
🏗️ Building the Custom Media Component
To ensure that my media uploaded through the file schema type had sufficient support and configuration, I created a custom modular component that accepts the media reference data (fetched from Sanity API/CDN via the schema during SSR) passed in as props from the page component.
The component will conditionally style the media based on its type - where a reference with '_type' of 'image' is always the Main Visual for an article, '_type' of 'file/image' is always the image in an article body, and '_type' of 'file/video' is always a video shown in an article’s body.
In the Sanity Studio, each structured content block of a Document Object, like a Blog Article, is stored as a nested JSON object containing metadata about the block and its content. The content’s objects each have a ’type’ property identifying its schema definition like 'block' for text, ‘image’ for images, etc. This is what I am talking about when I say '_type' of.
The media passed into my component (an image or file) will also have an object called 'asset' with a '_ref' and a '_type' indicating reference to the media stored in the Sanity CDN. So, by checking the '_type' of the block (like 'image' or 'file') and parsing the ’asset._ref’ string (which starts with image- or file- and ends with the format like -webp or -mp4), I can determine what type of media asset is being passed to the component and its role.

The top “BodyImage5” is the file/image uploaded to the CDN. The ‘const ref’ is where I initialize the parsing process through my media component to determine what type of media is being passed in
I made four variables in the component that would each help me determine which media type I am working with through parsing, and then I could accurately manipulate the media data with precision. For example, one is called “isMainVisual” and it is only used for the main visual - which was easy to parse because it was the only image field I left in the studio, so it could be referenced as an image asset. I can just check if the media._type = "image".
The Main visual will always be a static image, so I thought it was best to leave it as an image field to take advantage of the hotspot feature and conveniences of the Sanity Image builder - which made this specific implementation step a little easier for me.
Using media.asset._ref.startsWith("file-") would be how I could parse the other media with a secondary media.asset._ref.endsWith("-webp") or .endsWith("-mp4") to distinguish the two file types further.
For good measure, I also added logic to handle any stray JPG or PNG that accidently find their way into a file type. It's not ideal, but I have collaborators who also create content through my studio and I wanted to give them room to make mistakes. This was the purpose of the fourth variable.

I had some problems with the component initially, because I was trying to handle fetching or URL construction logic client-side within a component that was rendered within a server component page.tsx. I had to take some time to ensure the Sanity client configurations and media reference data fetching happened appropriately on server side, and passing only the necessary media reference data down as props to the client-side Media component.
This actually made the performance of the component faster anyway because the necessary media reference data was fetched on the server and just passed into the component for client-side handling and generating the appropriate media elements for display. It didn’t need to be passed anywhere else once it was in the media component itself, because I leveraged @sanity/image-url to generate optimized image URLs from the Sanity reference data for images, and standard HTML5 video elements for the MP4s from within the component.
The media reference data was now fetched during SSR, passed into the client, given to the media module, built from within the module, and returned out. It is now a closed and extremely efficient Client Side Rendering system for image and video.

📊 Optimizing Media Loading and Overall Impact
This component turned out to be a huge single point of optimization for my code. It assigned styles, formatting, priority tags, objectFit settings, and various other configurations based on if the file was an image type (always the Main Visual), a file/webp type (always article body content), or file/MP4 type (also always article body content - but videos, they need autoplay, muted, loop, and other settings to play automatically in the browser).
I was able to pass all of my media everywhere in my app - aside from pre-locally bundled images like author photos - through this component. I initially gave all of my media lazy loading so I could completely minimize my page load time on the network metrics tab (for the flex) but I didn’t like the delay of whitespace that a user would see if they scrolled too fast down the page - or if they used the In-page anchors that I set up at the top of each article that would scroll to a section of the article very quickly.
Instead of keeping lazy loading, I set up eager loading for all body media but I gave priority = true to the Main Visuals and locally bundled author profile images because these are the first things a user sees when they open an article. So these assets will download first, paint the viewport, and then the rest of the content will download shortly after to avoid any risk of gross-nasty whitespace while images are loaded.

With my new architecture and smaller media footprint, eager loading was a significant overall improvement to user experience over lazy loading
The change from Lazy to Eager with selective priority didn’t impact my initial DOM load metrics significantly, still resulting in initial renders between 200-500ms depending on device and network. However, it does take a bit longer up front for the browser to render the whole page visually due to eagerly loading body content; between 500-800ms generally.
This additional time to load the whole page initially is negligible though, because the user isn’t ever going to notice as the assets load outside of the initial viewport. No one is loading an article and within 100ms jumping to section 19 of 25. Getting rid of the possibility of whitespace here was a significant improvement to the user experience.
OK, so now I have all of the media handled through a custom component that renders different data conditionally with specific props and attributes depending on its type. The component is also easily scalable and I can add more conditionals for different viewport configurations easily as needed in the future.
Refactoring the media and adding this component alone reduced my total media size across the application by 90%+ as well as significantly improved the initial render and total page load times; which was a huge win in every way.
💧 Client-Server Interaction and Hydration
The only major challenge I had while building and using this media component was making sure that it ran entirely on the client side and was not conflicting with other server components in the pages where it was being utilized. I touched on that earlier, but it took me some time to work around already established code and functionalities, so I thought to give that issue, the solution, and the benefits their own section here.
I wanted the server to only render the structure of the content from Sanity and the translated HTML from it so that data could be passed to the client as fast as possible to reduce my page load speeds. To do this, I delegated media handling responsibilities (specifically, using the reference data to trigger the browser fetch and rendering) to the client through my custom media component.
One of the beautiful utilities of the component is that it is calibrated to work seamlessly with how Sanity data is fed to the frontend via SSR. When the server performs its SSR pass, it fetches data from the Sanity API—including text, structured content, and crucially, references (typically ref IDs) to media assets stored on Sanity's CDN as strings.
It's these reference strings that are then passed to the component on the client side, where assets of type 'image' (like the Main Visual) are used with Sanity's image builder library to generate URLs. For assets of 'file' type however, the component instead parses the asset._ref string to construct the direct CDN URL (like for WebP images or MP4 videos), allowing the browser to fetch and display them appropriately within the component's rendering logic.

Once the server-rendered HTML is given to the client, the browser begins hydration. The hydration process parses the HTML and discovers the Media Component that has nested Image and video tags, which use src attributes conditionally based on what data is passed into the Media Component.
These src references are then requested by the browser from the Sanity CDN using the generated URLs. For images, the component additionally uses the Sanity’s image builder library - @sanity/image-url - to take the CDN URL reference data and transformation parameters to generate the actual CDN URL string. For videos, it's the direct file URL.
The browser then performs the actual asynchronous HTTP fetch of the image or video file from this generated URL. This process allows the media files to be fetched by the browser efficiently while hydration continues.
Once the hydration finishes and the component passes the fetched data back to the DOM, there is already a div spot ready and sized for the media to be placed in, because I preset the size and styles through the Media Component. With the media file already fetched by the browser, it can just appear in the spot - which essentially complete removes layout shift.
I made sure to mark only the Main Visual of every article as priority using next/image, which handles priority loading, so that asset was loaded in first after the HTML hydration finalized. This ended up giving me a First Contentful Paint of ~200-400ms and a Largest Contentful Paint of ~500-700ms.
The initial DOM render (DOMContentLoaded) during production testing was between 400ms and 600ms on average. After the Main Visual and hydration was finished, the rest of the images loaded onto the page eagerly for an average of 400-800ms total visual completeness.

The Lighthouse Report for an article page after the media restructuring
🔡 Addressing Font Performance
At this point I was fixated on making Tsundoku as fast and efficient in every way I could. I was learning so much, and having a lot of fun while doing it. Now, with all of my media formatted optimally and rendering implemented strategically I was looking for the next thing to fix - and Lighthouse was telling me that my fonts were a huge block for my page loading time.
When SSR is running in Next.js, generally the layout file runs first for routes within its scope - wrapping the page and other children layouts. If you want to apply global styles or head metadata in a Next.js v14 App router application, you typically do it in the root layout file or import into it.
It’s important to know this, because my fonts were being fetched and preloaded from head link tags or CSS @imports in the head element of the layout file - meaning they were loading first and blocking rendering from any page or component in the app until the fonts were fetched from Google Fonts or somewhere; and that is a place that I can optimize!

I learned how to use custom fonts across almost all projects using React and React-based Frameworks - like I am using with Next.js - and it was pretty straightforward. First, make something like a fonts directory in the public folder so that when a project is built, they are copied directly to the build output, not bundled. Next, create something like a fonts.css file where you can call a @font-face rule that contains the font family name, the path to the font in the public folder, the weight, and the style of the font.
When you download a font, you’ll generally get light, medium light, bold, semibold, and lots of similar “styles” of that font. These are meant to correspond to the weight they are assigned to when you call them with font-weight: 600, etc.
Regular, Medium, Semibold, and Bold are the most commonly used for 400, 500, 600, and 700 weights respectively - so I made those 4 weights for each of my fonts and pointed them to each appropriate file in my new fonts folder; and then an extra font-style for italic to be complete. I also learned that “woff2” is considered to provide the best compression for a font format, so I used that where I could.
You can also use font-display: swap in a @font-face rule to indicate to the browser to use the native fonts in place of the custom fonts while the custom fonts are being loaded and applied, so the page can load and display as fast as possible.
Using this property is generally considered "best practice" and advised through tools like Lighthouse and PageSpeed Insights. I'm using it currently, but considering removing it for user experience because I don't want user's to ever see fonts changing dramatically - but I haven't seen that yet in production testing. If I ever get a complaint about it or notice it myself, I'll remove it but for now it's applied.
Anyway, now we have fonts downloaded in the format we want, with files corresponding to weights in a public folder, and @font face rules specified. You’ll want to import the fonts.css file (or wherever you put your font faces) into the layout file of the App Router; and that’s it. Now you have locally hosted fonts that the browser doesn't need to fetch from an external origin first, reducing a potential render-blocking request.

This is what my fonts.css looks like
You can also specify in the head of the layout if you want to preload certain fonts and weights, like what I used for the title of articles, the description, and the body. This is one is a small but significant optimization step, and another large contributor to my super fast Contentful Paint times.
I found out after I finished setting this up that a more modern and often recommended approach in Next.js is to use the built-in @next/font feature, which automates self-hosting, handles preloading, and helps prevent layout shifts without manual @font-face CSS - but I'm glad I learned how to do it manually. I like knowing how things work at its core before I learn how to use the abstracted version. Something to keep in mind though in case I ever run into a deep issue with my fonts, but I haven't noticed any issues yet.
That being said, Next.js really is an amazing and expansive framework with a lot of tools and libraries - built off of React as a 'next step' for hybrid server-side and client-side integration that's scalable up to enterprise use. I’m glad I built this project with it and got more familiar with how to structure projects and with with SSR/CSR integration specifically. Some Next implementation is transferrable to other frameworks too, like SvelteKit - which is what I am using on my next project.
There were two specific issues that - although they do not impact load time metrics directly, they improved layout issues I faced on mobile and code navigation inefficiencies. Both fixes therefore improved the quality of the project and deserve to be in my case study.
📱Honorable Mentions: The Mobile Image Fix
During the refactor of the media output through my media component, I had a configuration or something somewhere that was breaking specifically my portrait mode on iPhone safari renders.
It was especially frustrating because all of my tools on desktop showed that the render at that screen size worked, so I had to keep pushing fixes to production through Vercel to test on my phone - only to realize nothing was working!
As it turns out, all of my media was built like this - in a parent div that expanded to a certain width and auto detect height, aligned to the center, and set to fill the parent to the width while taking up as much height as needed. This would allow for some articles like Uni’s UI checklist pt.1 to have longer images similar to what a mobile render would look like, and it would fill naturally to elongated rectangular screens.
However, Safari (and probably other browser’s) have some overriding properties that were not rendering my images properly. And when they were rendering, they were perfectly centered but not filling the width of the parent div.
The fix was - I had to explicitly state to the browser that I want the parent div to have a max width of 100% of its available capacity, with a relative position to where it was placed in the body of the page, and on its child (the actual media) I gave it 100% viewport width (which was capped to the parent’s width) and align-self: stretch instead of center.

Mobile layouts don’t care how clean and versatile your HTML and CSS are — they need explicit rules. If they don't get them, they will make their own.
🖥️ Honorable Mentions: Code Reduction
Tsundoku and the Admin studio are built to allow for 25 sections of content organized in any way the content creator wants to organize it. The sections each contain a combination of an portable text block, an in-page link to the text block, a quote, an image, an image alt description, and an image caption.
The studio itself has conditional rendering to where each section requires either a text or an image to be entered as an input before the next section becomes available for use. This allows for content creators and editors to enter a text, then image, then image, a text, and any combination of content in any order we choose up to 25 sections.
Now knowing how the data is structured, it should be easier to follow along. I had previously set up complicated conditionals in the frontend checking for each piece of content, and providing render logic if it exists - for every piece of content. Six potential pieces of content for a section, copied and pasted over 25 sections ended up taking up around 800 lines of code. It worked fine, but maintaining it or something like adding in my new media component was so cumbersome. I had to edit a lot of code where it could have been condensed into one area.
To cut down the code, I created an array called Content Sections where each element of the array was a bundle of those aforementioned six pieces of content. I used the Array.from method with { length: 25 }, (_, i) as arguments to establish empty values in each element on initialization and provide an extra undefined variable for later use.
Then inside of the from function, each assignment to an element of my new array would have have an incrementing closed over index variable of index = i +1, which would keep track of all content sections. Then in the return statement I wrote an id property with was an interpolated BodyText${index}, and the rest of the section content each as a property with the fetched post data and more interpolation with indexes, like this;

All I had to do now was make sure each piece of content in my studio matched these names - which they already did.
📝 Final Performance and SEO Results
After the complete media and rendering strategy refactor, I was able to reduce the total media size of the entire site (at the time of writing) down to approximately 4.5MB with ~90% reduction to static media size and ~98-99% to animated media size.
I was also able to reduce initial viewport page rendering times significantly, with average total visual completeness around 300-500ms depending on page content, from the initial state of 3-4 seconds; a 80-90% reduction to perceived page load times - varies across devices and networks.
The total page load time was reduced from anywhere between 2 and 4 seconds to between 400 and 800ms - again depending on the media content of the article, the device, and the connection; ~75% reduction in total page load time - now with complete prioritized eager loading.
This performance refactor was a complete and resounding success. There were only micro-optimizations left that I could do from here, but PageSpeed Insights and Lighthouse were consistently giving me 98-100 scores on performance, and navigating the site for testing is honestly just a pleasure.
Swapping pages through the mobile slide menu is so fast, the new page viewport loads before the CSS transition animation to close the menu is 30% complete. Anything additional from here would be a professional-grade optimization (if everything I did already wasn’t considered to be that) and not needed for my site at this time.

My accessibility was almost perfect already, I just needed some small corrections. Aside from tidying up some alt tags on SVG image Link tags to tell screen-readers what they were, all I needed was to ensure all of my nested lists were structured as <ul><li><Link/></li></ul> for semantic reasons, and make sure buttons weren’t nested in next/Link tags. Links can be assigned onClick handlers, so there is no need to nest buttons in them.
To get my scores to be perfect across the board - the very last things that I needed to do to complete my optimization was to install next-sitemap, set up a general configuration file, and run the sitemap generator to make some sitemaps and a properly configured robots.txt.
This is important for my Next.js app specifically, because each of the Blog Articles are dynamically pathed, not statically pathed. So making a sitemap for static and dynamic content and a robots.txt file that allows for crawling is a must to be indexed and crawled correctly by search engines for your website to be found.
As a bonus: I also learned about Google Search Console, where I can register and verify my websites with Google to monitor performance on Google Search, submit sitemaps, and check indexing status. It's a crucial tool for understanding how Google interacts with your site.
Now, on a search engine like DuckDuckGo that does not have tracking and targeted ads, if you search “Tsundoku blog” - my website Tsundoku.blog is (at the time of writing,) the third and fifth hit 😎 and that is pretty amazing.

Proof!
All being said and done, my Blog site is now extremely fast, optimized to a T, indexed and crawlable, accessible, and follows Best Practices - according to Lighthouse and PageSpeed Insights. The final Lighthouse and PageSpeed Insights scores were 100, 94, 96, and 100 on the landing page, and higher for article pages.
I also had the opportunity to use some of the techniques I learned during this refactor on my portfolio site too, and it is now just as performant and compliant with SEO, Best Practices, and Accessibility. These lessons aren’t just for blogs or portfolio sites though—they’re for any product where speed, scalability, and user experience drive growth.
This was an extremely rewarding refactor of a project that I have close to my heart, and with all of the effort that I put into making it near perfect - I decided to make the repositories for all of my refactored projects private.
🔐 On Private Repositories
I know, I know, it's not the best idea for someone trying to find a job to hide their work - but my hope is with the thorough READMEs that I have in public facing repos for each project on GitHub, these long form blog articles about feature implementation and refactors, the ability to confidently discuss any part of my projects across any part of the stack, and perform similar types of engineering upon request - I am more than able to prove I am able to do work like this professionally.
Until then, Tsundoku and its Admin Studio are my professional work, and I will treat them as such. If you are an employer or someone looking for a contract to sign with me and you want to see my repos, sincerely, please reach out. I would love to screen-share on a call and walk you through my projects - talking about my work gets me excited 🤭
I have long-form content on Tsundoku, short-form project assessments on my portfolio, READMEs on my GitHub, live sites, and I’m happy to walk through my codebases. I’m not hiding anything - I am simply protecting something valuable.

🤝 Connecting and Conclusion
If you are interested in discussing this project or site with me, or any type of engineering work really, I am happy to do so. I’m looking to network and talk to new people about things that we both like involving tech. I’ve also been branching out into systems engineering and have been working on a project with a Rust backend and Svelte front-end, so that’s what I’ll be doing the the near to mid term ☺️
Feel free to reach out through the contact form on this website, there is also a contact form on my portfolio, message me on LinkedIn, or just skip all of that and send an email to my personal email address; mr.steven.theuerl@gmail.com.
Thank you for reading to the end - I hope you got something out of this article. This should be the last blog post from me for a bit while I go into hiding and apply for more jobs - and secretly work on my next big project 🤫 So if you want to work with me, hurry and let me know before I get a new job and get super busy 🤭

Take care, and thanks again! Cheers🍻
Steven
Content Management with Sanity: From ‘A Studio’ to ‘A Nice Studio’
How and why I customized my Sanity Studio—adding a preview pane, dynamic slug routing, SSR cookie-based session handling, and API routes to improve content editing.
Steven
From Curious to Coding 2: Building a Blog with Next.js, Sanity, TypeScript, and Tailwind
A detailed account of the development of this blog, what I learned, and what I used to build it.
Steven
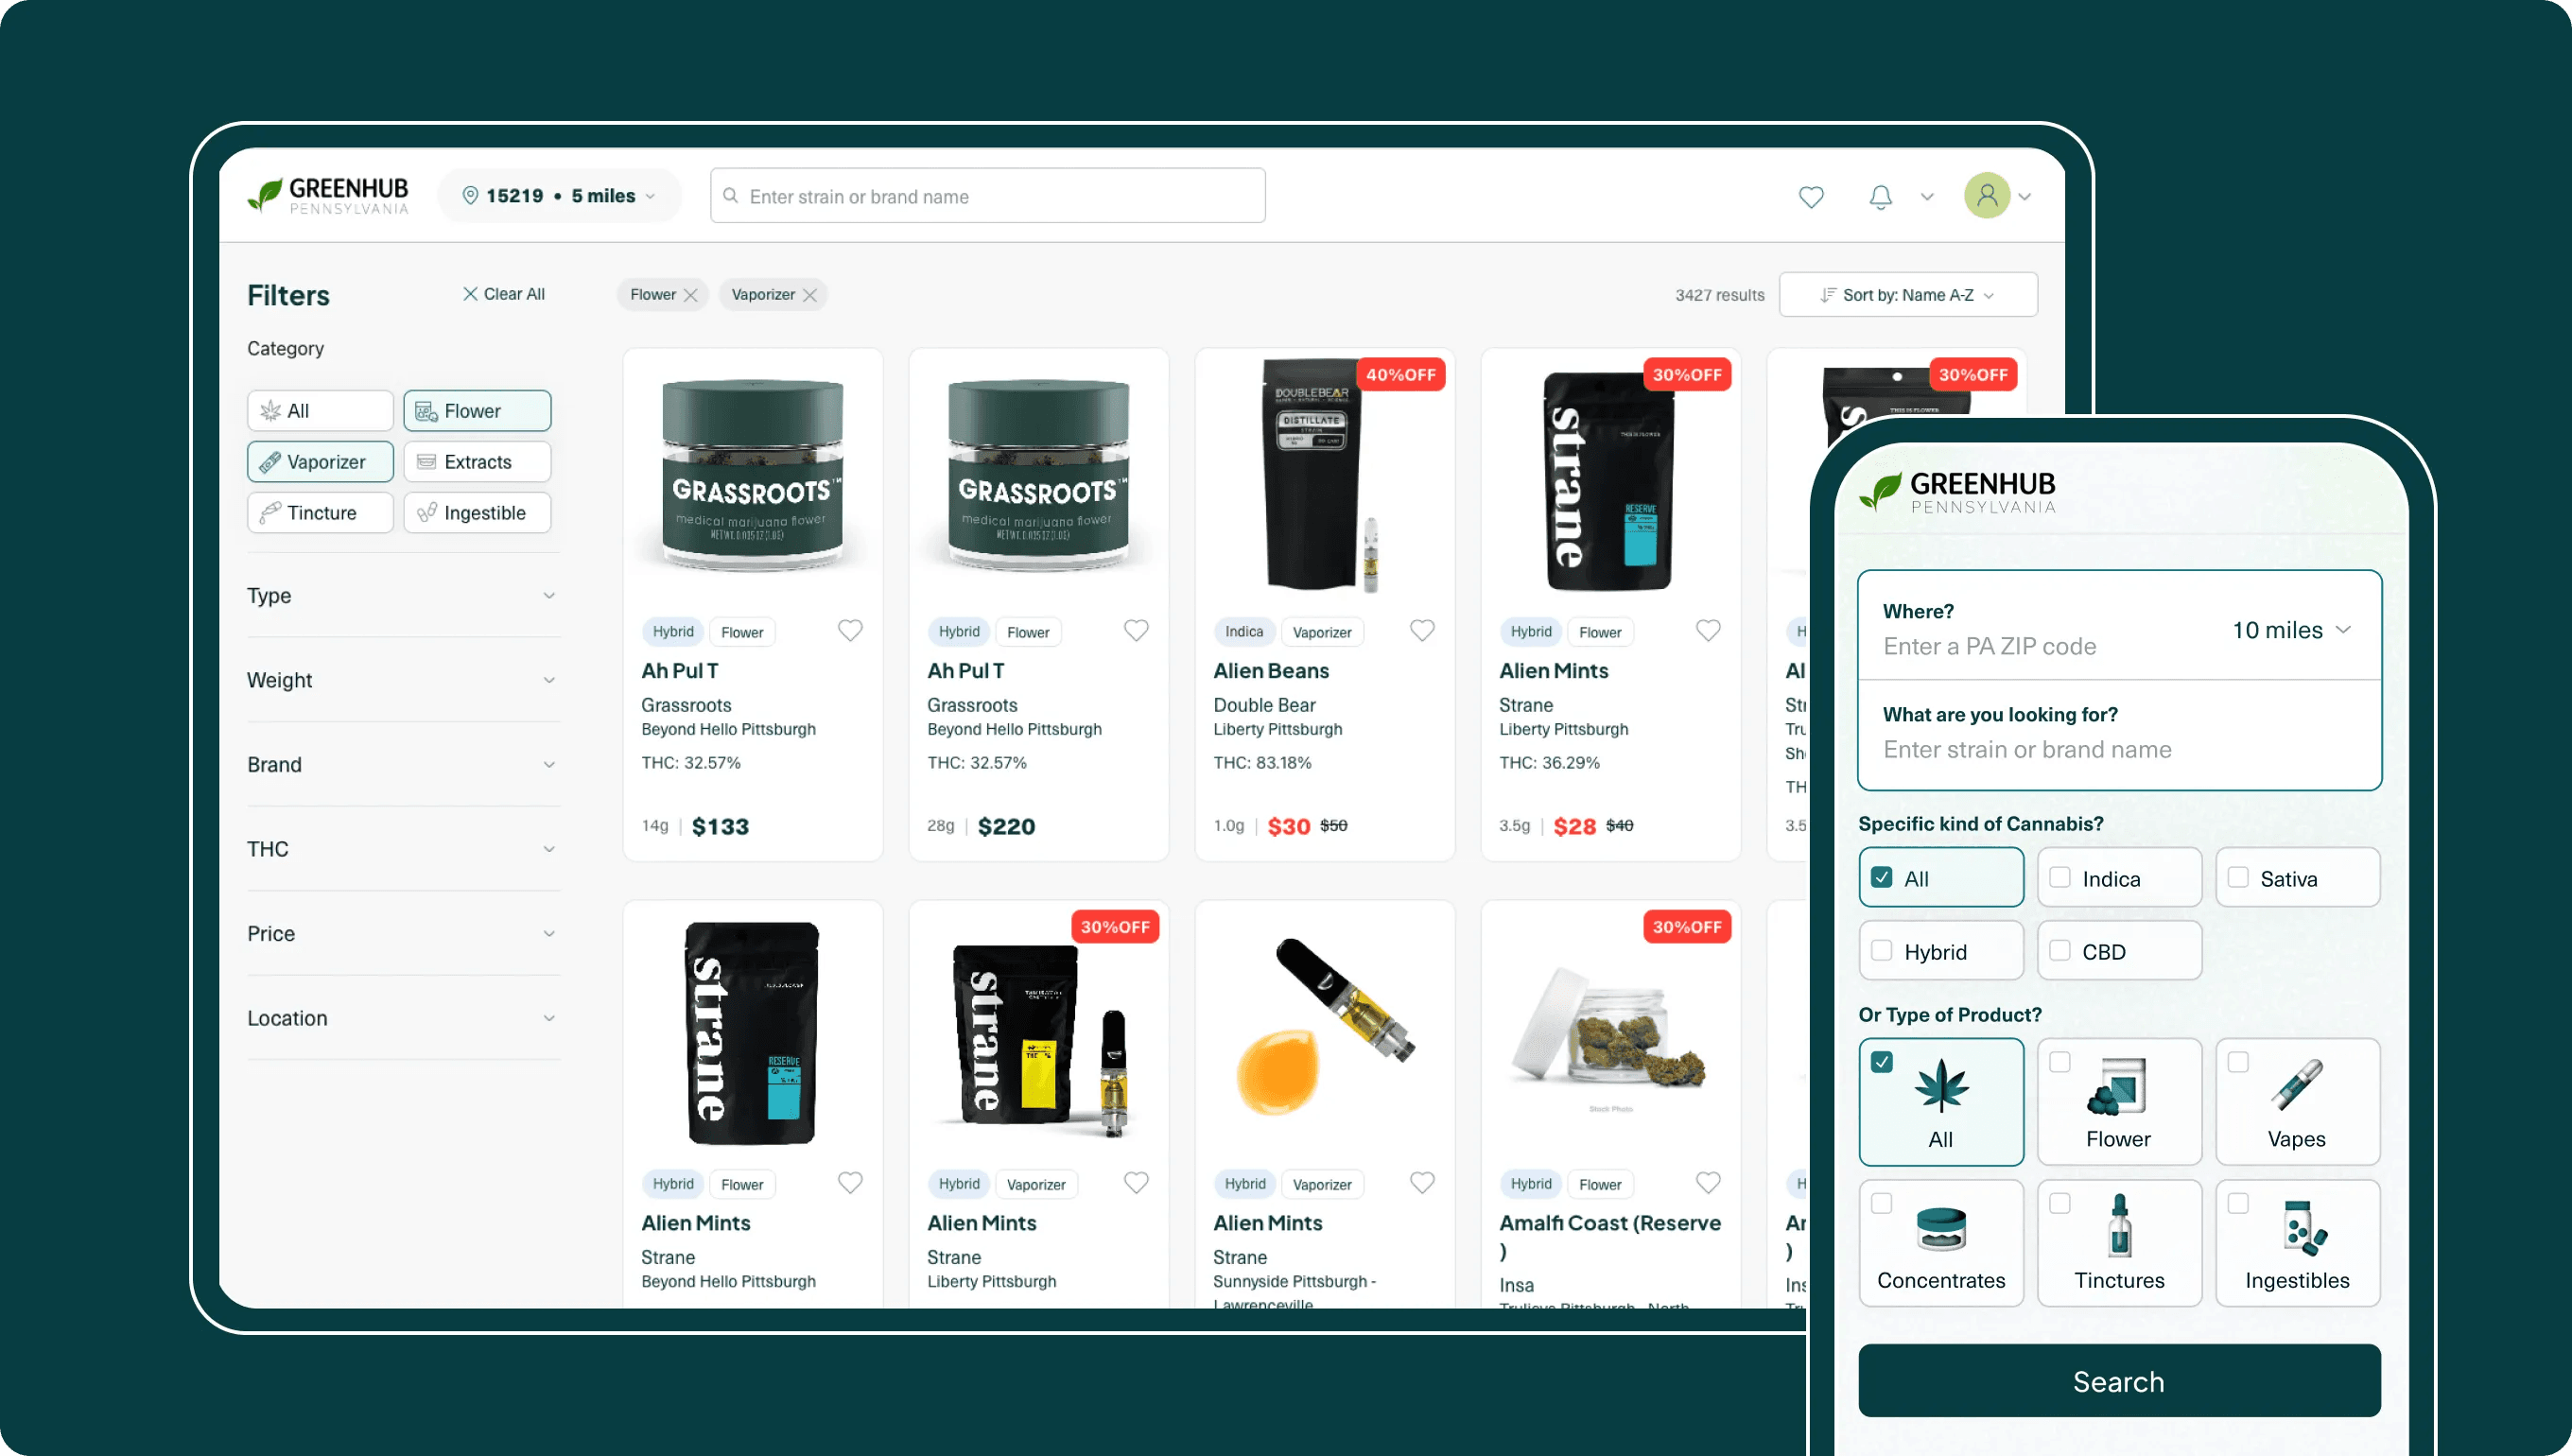
Making Data Beautiful: Building Greenhub’s End-to-End Architecture
From an Idea to Full SaaS; End-to-End development on a Statewide scale. How I built the architecture for Greenhub and made finding information easier for thousands of people.